
2022/1/20更新 dovecot.conf
2022/1/21更新 master.cf 使われていないパラメーター削除
2022/1/22更新 SMTP認証で250-AUTHが返ってこない問題
クラウド全盛のこの時代に、スタンドアロンで鯖建てする意味は希薄なのかもしれません。が、逸般の誤家庭の事情で積年の課題だったオンプレミスなメールサーバーを構築したいとの想いからとにかくメモします。
参考にしたサイトはCentOSでのサーバー構築サイトとして定評のあるCentOSで自宅サーバー構築 です。
今回は、smtps, imaps, pop3s による通信暗号化、SMTP-AUTH認証、Thunderbird, Evolution, Outlookでのメール送受信を目標にしています。
参考リンク:
メールサーバー間通信内容暗号化(Postfix+Dovecot+OpenSSL+Certbot)
前提として、上記サイトのメールサーバー設定済みとします。
最初に、PostfixのSELinux保護によるpostfix_local_write_mail_spool のboolean値をon にします。
# setsebool -P postfix_local_write_mail_spool on
# getsebool postfix_local_write_mail_spool
postfix_local_write_mail_spool on ←確認
次に、
SMTP-AUTH(認証機能)を使ったメール送信 Postfix + dovecot の設定
を参考に/etc/postfix/main.cfファイルに下記パラメータを追記します。
/etc/postfix/main.cf

local_recipient_maps =
luser_relay = unknown_user@localhost
smtpd_sasl_security_options = noanonymous
smtpd_sasl_auth_enable = yes
smtpd_sasl_local_domain = $myhostname
smtpd_sasl_type = dovecot
smtpd_sasl_path = private/auth
smtpd_tls_auth_only = yes

disable_vrfy_command = yes
smtpd_recipient_restrictions = permit_mynetworks,permit_sasl_authenticated,reject_unauth_destination
SMTP 認証がSMTP エラー (250): Authentication failed で失敗します にある通り、telenetでSMTP認証を確認できないときはまず、cyrus-sasl-plain cyrus-sasl-md5をインストール済みであることを確認します。それでもTLS経由のSMTP接続を止めてパスワードによるSMTP認証にしたいときには、お好みで以下のパラメータをコメントアウトすると良かったようです。
# yum install cyrus-sasl-plain cyrus-sasl-md5

/etc/postfix/main.cf

#smtpd_tls_auth_only = yes
#smtpd_tls_protocols = !SSLv2,!SSLv3
#smtpd_tls_ciphers = high
参考URL:SMTP サーバーのトラブルシューティング
続いて、/etc/postfix/master.cfファイルの必要項目の行頭コメントを外して設定を有効にします。
/etc/postfix/master.cf

smtp      inet  n       -       n       -       -       smtpd
#smtp      inet  n       -       n       -       1       postscreen
#smtpd     pass  -       -       n       -       -       smtpd
#dnsblog   unix  -       -       n       -       0       dnsblog
#tlsproxy  unix  -       -       n       -       0       tlsproxy
submission inet n       -       n       -       -       smtpd
  -o syslog_name=postfix/submission
#  -o smtpd_tls_security_level=encrypt
  -o smtpd_sasl_auth_enable=yes
#  -o smtpd_reject_unlisted_recipient=no
#  -o smtpd_client_restrictions=$mua_client_restrictions
  -o smtpd_client_restrictions=permit_sasl_authenticated,reject
#  -o smtpd_helo_restrictions=$mua_helo_restrictions
#  -o smtpd_sender_restrictions=$mua_sender_restrictions
#  -o smtpd_recipient_restrictions=permit_sasl_authenticated,reject
  -o smtpd_relay_restrictions=permit_sasl_authenticated,reject
  -o milter_macro_daemon_name=ORIGINATING
smtps     inet  n       -       n       -       -       smtpd
  -o syslog_name=postfix/smtps
  -o smtpd_tls_wrappermode=yes
  -o smtpd_sasl_auth_enable=yes
#  -o smtpd_reject_unlisted_recipient=no
#  -o smtpd_client_restrictions=$mua_client_restrictions
  -o smtpd_client_restrictions=permit_sasl_authenticated,reject
#  -o smtpd_helo_restrictions=$mua_helo_restrictions
#  -o smtpd_sender_restrictions=$mua_sender_restrictions
#  -o smtpd_recipient_restrictions=permit_sasl_authenticated,reject
  -o milter_macro_daemon_name=ORIGINATING
ルーターの25,587,465ポートを開放、firewalld設定、postfix再起動してステータスを確認。
# firewall-cmd --add-service=smtp --permanent
# firewall-cmd --add-service=smtp-submission --permanent
# firewall-cmd --add-service=smtps --permanent
# firewall-cmd --reload

# systemctl restart postfix
# systemctl status postfix
参考書: CentOS 8実践ガイド[サーバ構築編] | Amazon.co.jp

次に、Dovecotのログインユーザーとパスワードの認証方法について追加設定をしていきます。
詳細は、質問掲示板に記述がありシステムユーザーを参照するshadow, passwd,pam認証などがありますが今回は、passwdfileでの認証を別途していきたいと思います。
参考URL:https://www.ipentec.com/document/linux-dovecot-read-postfix-virtual-mailbox-for-centos6
まず、/etc/dovecot/conf.d/10-auth.conf ファイルの !include auth-passwdfile.conf.ext を有効にしてpasswdfileによる認証方法に変更。
/etc/dovecot/conf.d/10-auth.conf

#!include auth-deny.conf.ext
#!include auth-master.conf.ext

#!include auth-system.conf.ext
#!include auth-sql.conf.ext
#!include auth-ldap.conf.ext
!include auth-passwdfile.conf.ext
#!include auth-checkpassword.conf.ext
#!include auth-vpopmail.conf.ext
#!include auth-static.conf.ext

/etc/dovecot/conf.d/auth-passwdfile.conf.ext

passdb {
  driver = passwd-file
  #args = scheme=CRYPT username_format=%u /etc/dovecot/users
  args = /etc/dovecot/passwd
}

userdb {
  driver = passwd-file
  #args = username_format=%u /etc/dovecot/users
  args = /etc/dovecot/passwd
}
続いて、SMTP-AUTH認証を有効にするため同じく、 /etc/dovecot/conf.d/10-auth.conf ファイルのauth_mechanismsにCRAM-MD5暗号方式を追記、
/etc/sasl2/smtpd.confファイルのmech_list:で指定する暗号方式と同じく整えます。
/etc/dovecot/conf.d/10-auth.conf

auth_mechanisms = plain login DIGEST-MD5 CRAM-MD5

/etc/sasl2/smtpd.conf

mech_list: plain login DIGEST-MD5 CRAM-MD5
続いて /etc/dovecot/conf.d/10-master.conf でpop3,imapのポート番号である110,143 をport = 0 として無効にしてimaps pop3sのプロトコルポート 993,995 の許可設定、Postfix smtp-authの有効設定を追加します。
個別的には#ssl = yes などのコメントアウトを外せばOKです。
参考サイト:Linuxで様々なサービスを構築しよう!!!| Dovecot 2.0の設定方法
service imap-login {
  inet_listener imap {
    port = 0
  }
  inet_listener imaps {
    port = 993
    ssl = yes
  }
#
service pop3-login {
  inet_listener pop3 {
    port = 0
  }
  inet_listener pop3s {
    port = 995
    ssl = yes
  }
}

# Postfix smtp-auth
  unix_listener /var/spool/postfix/private/auth {
    user = postfix
    group = postfix
    mode = 0666
  }
一方で、/etc/dovecot/dovecot.confファイルの以下のコメントを外して設定を有効にします。
protocols = imaps pop3s
listen = *, ::
これはprotocols = pop3s imaps としても良いのですが、CentOS7では systemctl status dovecot -l で下記のWarningが出るためです。 (2022・1・20更新)CentOS7では下記Warningが出ますが問題ないようでした。
config: Warning: Obsolete setting in /etc/dovecot/dovecot.conf:25: 'imaps' protocol can no longer be specified (use protocols=imap).
config: Warning: Obsolete setting in /etc/dovecot/dovecot.conf:25: 'pop3s' protocol can no longer be specified (use protocols=pop3).
ルーターの993,995ポート開放、firewalld設定、dovecot 再起動してステータスを確認
# firewall-cmd --remove-service=imap --permanent
# firewall-cmd --remove-service=pop3 --permanent
# firewall-cmd --add-service=imaps --permanent
# firewall-cmd --add-service=pop3s --permanent
# firewall-cmd --reload

# systemctl restart dovecot
# systemctl status dovecot
アカウントを追加してdoveadm pw -s コマンドで生成してハッシュ化されたパスワード,gid,uid Maildirをその都度、ユーザー情報に追加していきます。
# useradd -s /sbin/nologin testuser
# passwd testuser
# saslpasswd2 -u mail.stuffy.site -c testuser
# doveadm pw -s CRAM-MD5
Enter new password:
Retype new password:

/etc/dovecot/passwd

testuser@mail.stuffy.site:{CRAM-MD5}aabbccdd009988ee:1002:1002:::::Maildir:/home/testuser/Maildir
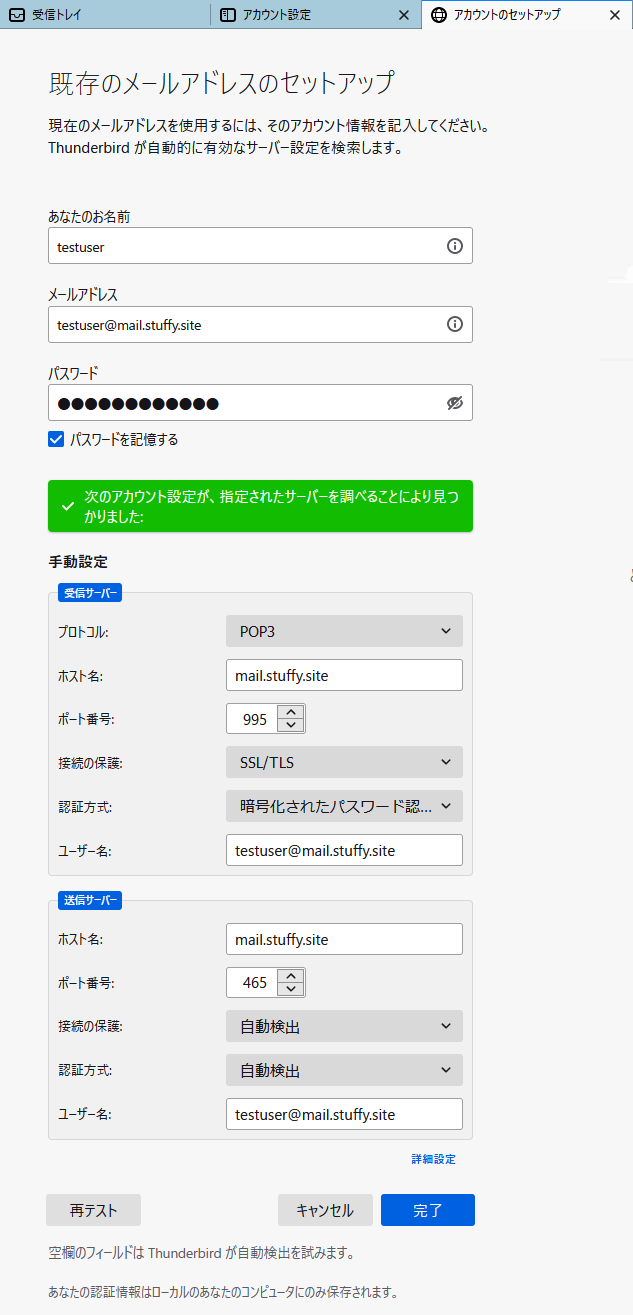
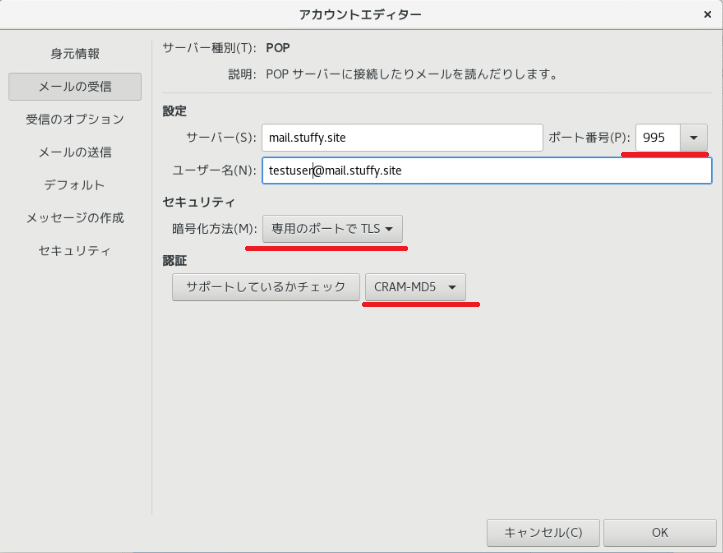
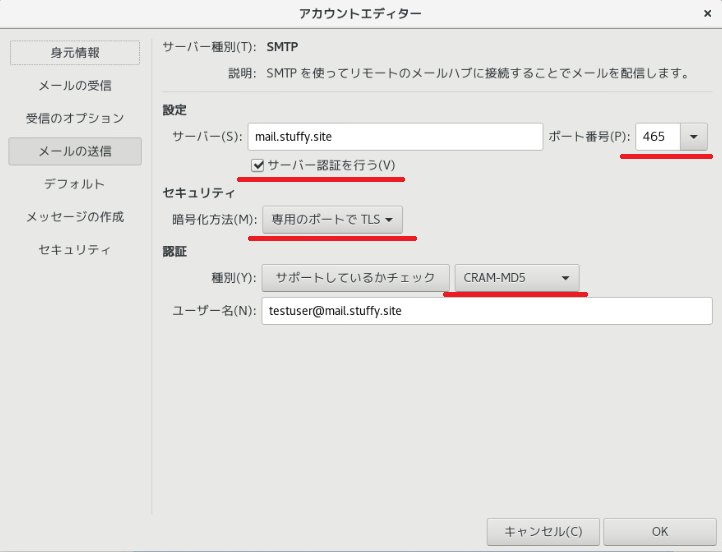
Thunderbirdのセットアップ
| 設定項目 | パラメーター |
| ユーザー | testuser@mail.stuffy.site |
| パスワード | ●●●●●●●●●●● |
| ホスト名 | mail.stuffy.site |
| 暗号化 | TLS |
| 暗号方式 | 暗号化されたパスワード |
メールの送受信ができることを確認します。
『Thunderbirds are GO!』
・
・
・
GNOMEデスクトップGUIのメールアプリEvolutionをインストール
# yum install evolution
EvolutionのPOP CRAM-MD5の設定
EvolutionのSMTP サーバー認証,CRAM-MD5の設定
Evolution(2号)で送受信できることを確認します。
Microsoft Outlook で同様に設定してみます。
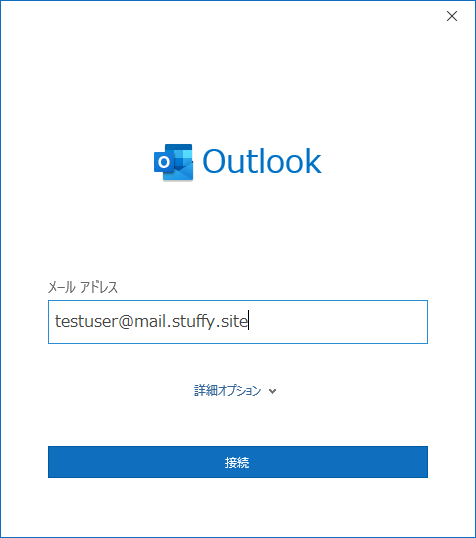
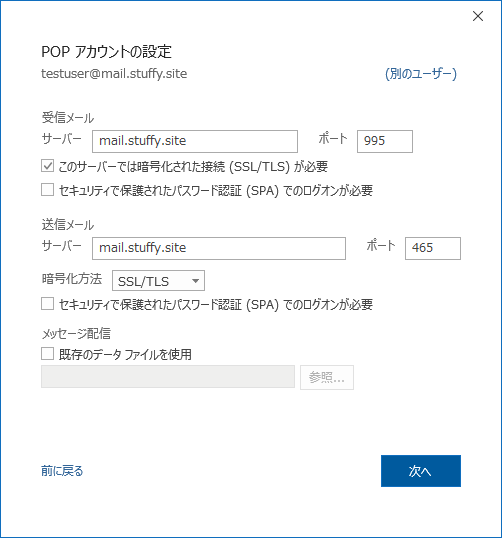
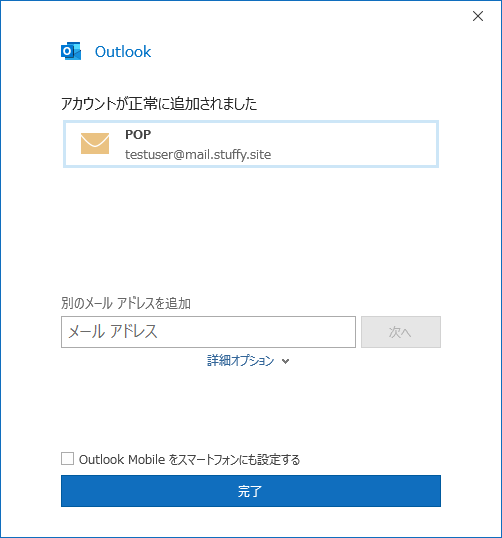
Outlook(3号)、確認できました。
お疲れ様でした。
上手くいかないときは、ログ /var/log/maillog を確認しよう!
# postconf debug_peer_level=4
# tail -n 100 /var/log/maillog | grep dovecot

# postconf debug_peer_list="" ←元に戻す
参考書:CentOS 8実践ガイド[サーバ構築編] | Amazon.co.jp

最後までお読み下さりありがとうございました。